
Carbon repair on seat tube and seat post clamping
How the seatpost is best assembled


Again and again we have inquiries about defective clamping of seatposts.
Why this happens and how to provide a precautionary remedy, we show in this article.
Carbon, exact name carbon laminate, is characterized by its superior stiffness at low density and weight. This predestines the carbon fiber for lightweight constructions.
Of course, this has a counterproductive downside when it comes to point and terminal loads. Dot loads occur e.g. at the dropout of carbon on a bicycle frame, which are caused by the quick release, loads which of course are necessary to securely fixing the wheels in their position.
Only when you have the smallest detail under control, you can prevent overloading of stiff carbon structures and eliminate consequential damage by proper installation in advance.
The right seat tube clamp for round seat posts
But now back to saddle / seat post clamping, the most important thing of a wear-free clamping is a guide with the lowest possible tolerance. The inner diameter of the seat tube to the outer diameter of the seat post should be kept as low as possible. Our recommendation is max. 0.2 mm tolerance, as well as the use of carbon mounting paste.
Why such tight tolerances in the saddle / seat post clamping?
The background and cause is the stiffness of the carbon material. If too large the gap, given a too large tolerance in the inner to the outer diameter, the seat tube end, until it comes to contact with the seat post, must cover a relatively large radial path. In such a case, the entire lightweight structure comes under immense preload by unnecessary overstretching a rigid structure and reduces the dynamic workload for driving significantly.
If it comes to driving vibrations, shocks, etc., which are all by the rider's weight logically not of a small nature, the "poor end" of the seat tube has to suffer extremely. The clamping must absorb the entire load itself. But if this connection is subject to pre-loading, the overload will be very fast. This overload then breaks track at the weakest point, at the discharge slot for the clamping.
The remedy here is to create the largest possible contact surface between the seat tube and the seat post with a tight tolerance and using carbon paste for a tolerance compensation to reduce the clamping forces (up to 30%). This saved clamping forces are then again in driving dynamic as a reserve available, here they are also needed and not in the clamping itself.
In addition, we recommend to choose the seat post so that at max. saddle height, the lower end is still at least 3 cm below the lower edge of the top tube enough, so that an abutment for the forces can be built and not everything on the seat tube end loads. Of course, this presupposes that the diameter fits in the lower area as well as possible to the outer diameter of the seat post.
Using carbon fiber paste, tighten the seat clamp with a torque wrench starting from the lowest value. A clearly motto is: less is more! The lowest clamping force for a secure fit of the seat post gives them a much larger working area in use and thus protects the highly stressed end of the seat tube in the long term.
At this point it should be noted how valuable a complex fine adjustment in the seat post clamp is. The old artisan saying: After firmly tightened comes off! ... has its validity here as well, only that the "off" comes with a time delay.
At this point, however, caution is advised, the seat post must not slip uncontrollably, otherwise the upper blind rivet nut / threaded sleeve is sheared in the seat tube.
Clamping of aero seat posts
The clamping of aero seat posts is a special case, since each design is manufacturer-specific designed and no general statements can be made.
But our tip here too is the use of carbon assembly paste to reduce clamping forces to create more workspace in dynamic operation.
Start the clamping with the use of a torque wrench at the lowest value. Here is less often more work area in the field use on the road and is gentle to the structure, rather the seat post slips at the beginning of one or the other times and it is readjusted in small steps with a slightly increased torque.
Of course, there must be no uncontrolled "slipping" of the seat post, otherwise usually the aeroprofile of the seat tube can be damaged by the "corner edge" of the seat post. A tip therefore for aero frames, incline the rear edge of the seat post, to prevent punctiform penetration.
The alpha and the omega of a good seat post clamping
Summary
1. Pay attention to the smallest possible tolerances of seat tube to seat post in diameter, if necessary, change the seat post.
2. Use of carbon mounting / assembly paste
3. Use of a torque wrench
4. Start clamping forces at the lowest limit and readjust ... it's worth it !!!
5. Take your time and do not hesitate, so create the largest possible dynamic working space for your carbon frame, you will need it !!! or the frame will suffer
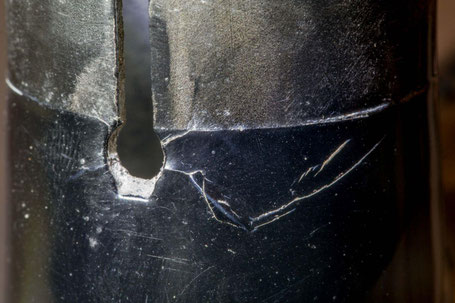
The repair of a saddle clamp - round
The repair of a saddle clamping can not be done to its original contour due to the high point loads.
In the first repair step, the cracks are rebuilt with fresh laminate, sealed and the original contour is worked out. In the second step, the saddle tube end is completely integrated with additional laminate, reinforced in order to dissipate the occurring loads over a larger area.
The saddle clamp as well as the seat post are required for the machining, on the latter we automatically produce a fully seated zero fit, thus eliminating tolerances.
However, if the seat post is replaced, with a smaller diameter, even the best repair can not guarantee durability and re-tearing is the result - usually in the edge zone of the reinforcement, the second repair step.

Share with friends

Start your request help(at)carbon-bike-service.eu via e-mail or via online form on our CONTACT page.